baskets

baskets

Thursday, April 10, 2014

My Basket
 
I was asked by a friend if her teenaged kids could make a basket  and I thought might be fun to see  what they would come up with so I came up with a simple base basket that they can weave with what ever color or size of reed they want.  I will share the simple base and you can make what ever you want with it.  its a basic woven solid base basket. 


My Basket


5/8 “ Flat (Stakes) Cut 14 @ 20”
3/8"Flat (Fillers) Cut 6 @ 14”
Choice of your weaver
3/8” Flat (rim row)
1/2” Flat Oval rim
11/64” or 3/16” Flat Oval (lashing)
Sea grass


Mark them all on the center and soak in water
Lay 7 of the 5/8” flat horizontally, then lay the 3/8" fillers in between the stakes matching at the center mark.

Take 1  of the 5/8" flat and weave in over the center mark making sure its weaved under the 3/8" filler and over the 5/8” stakes.

Weave 3 on each side and the base should be about 7.5”

fold over the filler and cut down the middle horizontally and tuck them in V shape

Twine once with  #3 round
Spray down base and upset stakes.
Start weaving with your choice of size and color

When you reach the height of your choice, add a rim row of 3/8” FF
Add 1/2 inch FO rim add sea grass or dyed round reed.
lash with 3/16 or 11/64 FO.

I did 
2 rows of 1/2" natural Flat Flat
1 row of 1/4"dyed Flat Flat
1 row of 1/2" dyed Flat Flat in contrasst
tripple twine once with dyed No2 round
1 row of 1/2" dyed Flat Flat in contrast
1 row of 1/4" dyed Flat Flat
2 rows or 1/2" natural Falt Flat
1 row of 3/8" flat flat as a rim row
rimmed with 1/2" dyed Flat Flat 
added seagrass and lashed with 1/4"Flat Oval.   

 Happy Weaving!


Saturday, March 29, 2014

Hi everyone, sorry, I've been really bad about keeping up with my blogging.  I have few excuses like my husband had his second back surgery and was home for a month! and my annual physical and blood test came back with low vitamin D level (like that's a surprise since its been a horrible winter here) which apparently been causing my unusual fatigue and joint pain, who knew they where caused by vitamin D level...... I've been medicated and crossing fingers that next blood test will show my level normal.

Last week I found this book  called WOOL BUDDIES by Jackie Huang, I'm sure you can find it at any book store.  I saw it and fell in love with these characters on the book.  Its a needle felting book.  what is a needle felting? well, I've always wondered about it but expected it to be really hard but this book just captured my heart and I had to make them no matter how hard it is!! so I purchased a felting sponge, needles and some wool. came home and just like that I was off!!  it was so simple and so easy, I am in love with needle felting!! I can't stop.

this is the first thing I made!!

then there was more


and more

 and more


I made the first part of the book all the simple ones and ordered more wool!! I can't wait to start on the second part of the book!!

they will be here in couple of days I can't wait!!
I have not forgotten about basket weaving! I have 2 basket I was working on and I will post the patterns soon!!

Thursday, February 13, 2014

Peaches and Cream Cake

Peaches and Cream Short Cake 


For this recipe I used:

6 eggs separated
130gram Sugar
90gram cake flour

3 Cups Heavy Whipping Cream
3 Tablespoon Sugar

3 cans Sliced California Peaches.

first line 2  (two) 9" round cake pan with parchment paper
set your oven to 350F

if you have a stand up mixer this wont take long so make sure you turn on the oven before you start.

whip egg whites in a clean bowl, when it start to foam, add a little sugar maybe 1/4 of it continue to whip until stiff.  the sugar seems to help keep the egg whites  from drying out.


in a separate bowl, beat the yolks and add the remaining sugar in thirds, keep beating until it resembles mayo white and very creamy.


add the cake flour in and mix


fold in the egg whites in thirds carefully not to deflate the egg whites.

 carefully pour the batter into the lined pan bake for about 18 min in 350F oven

once done its important to let the air out of the cake by dropping the pan on to the counter top immediately!!!  take them out of the pan and cool on a wrack.  Once cool to touch you can take the paper off and wrap it in plastic wrap if you are going to use it later or immediately, decorate with whipped cream and fruits.
(whip the heavy cream and sugar until stiff, don't over do it or it'll turn into sweet butter!!)

 You can practically do this with any fruit of your choice!! or shape of your choice!!


 strawberry and Kiwi


 mixed fruits


 strawberries and blueberries


 blueberries (I was little low on blueberries)


 Happy Baking!


Friday, November 15, 2013

I've been crocheting a little lately, when it gets cold, I enjoy working with yarn.  This pattern I found free on the net flower burst handbag you can go to her site and get a free pattern if you like.

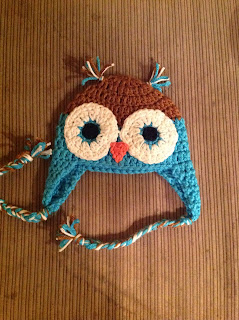
 Here is a hat I made for a friend who just had a baby boy. Owl hat she has kindly posted patterns for different size.  I made the eyes with crochet thread instead of buttons, buttons makes me nervous with babies.


here is a hat I made for my friend's teenage son since my almost 8 year old will not wear hats.
go to ravelry.com  sign up for free and you can search for free patterns.  there are lots of free patterns on there!

keep warm!