I will weave and create with joyful heart to share with you that all I have learned!
baskets
Friday, December 30, 2011
basket with trims
Labels:
basket weaving
Monday, December 19, 2011
so its been a while
Yes its been over a week since I last wrote. I have plans and things I want to post BUT I cannot find my camera battery charger!!! so I can't take pictures!! I also had a big big birthday party for my youngest and was quite busy planning and preparing for that festivities as well so I did have my handful but I haven't forgotten about this blog!! I will be back shortly to post patterns and recipes in a day or two.. meantime I'm going to go tare apart my bedroom, where I think the battery charger is and locate it, charge my camera and we'll be back to business! Mean time here is a card I made this Halloween using $1 stamps and some punches. the spider web is just a web printed scrapbook paper I punched out with large circle, spider stamp was punched out using medium size circle, and the scalloped circle was one of those extra large scalloped circle. and then we have the square punch in Large and the Jumbo scalloped square. all the stamps I used here was in the $1 bin at Michael's this year.
Labels:
craft,
random things
Saturday, December 10, 2011
Foxy Scarf
Several months ago, I was surfing the net (do they still call it surfing the net?) I stumbled upon a picture of a crocheted fox scarf. I just had to have it!!! I don't buy many patterns on line but this was something I just had to have!!! so I ordered the Fox, Raccoon, and Panda scarf pattern and within the hour I received a e-mail with a PDF files for all 3 scarfs!!! so I ran out the door to Jo-Ann's who I must say has the best selection of yarn at affordable prices. I know we have a "Yarn" shops here in Indy and they carry beautiful yarn but too expensive for something I'm making for kids and daily use. I quickly started it and I finished my scarf!! my younger son claimed it so I started making my second one and when I'm done I'm going to make the Raccoon one for my oldest Son's GF. Here is a link to the etsy site to purchase the pattern if you are interested. click if you want to buy the pattern from her.
Happy Crocheting!!
Labels:
crochet
Friday, December 9, 2011
Bucket basket
Today I'm sharing this bucket basket I finished last night, original pattern is called Fall Basket by Suzanne Moore who is one of my favorite author!! here is the link to the original basket pattern Fall Basket Pattern She is brilliant!!! anyway, I changed the dyed reed color because this basket is stinking cute so I wanted to use it year round, not just during the fall. I used dark teal, light brown and apple green (Rit Dye)I plan on changing the buckle around with the season and enjoy the basket all year long!! The buckle I used I had my mom make them at her ceramic class but similar buckles are available from Suzanne as well or find them at your local basket supply store here is Suzanne's link: click me! BTW most of her reeds are on sale right now until December 29th 5PM EST sale flyer . Enjoy!
Labels:
Basket Patterns,
basket weaving
Saturday, December 3, 2011
Pumpkin gooey butter cake
I had leftover pumpkin puree from Thanksgiving dinner, I got a big can to make 2 pumpkin pie but I only made one so I put the remaining pumpkin in a ziplock and froze it. So I decided to make Paula Dean's Pumpkin gooey butter cake.
all you need is a 1 box of cake mix, 2 stick of butter (yes its Paula's recipe) 4 eggs, 1-15oz pumpkin puree, 1- 8oz block of cream cheese, 1pound powdered sugar, some vanilla extract and cinnamon and nutmeg. Paula's recipe link. Its quick, its easy and most item you'll find in your pantry and the fridge. its very sweet so next time I may cut down on the powdered sugar.
Labels:
Sweets for Friday
Thursday, December 1, 2011
Grocery sack waste basket
for a while now I've been thinking about making a trash basket to fit the plastic grocery sack but I never really got around to coming up with the pattern until now. I wanted something that the bag handles will be hooked on but didn't want plastic bag handing over the basket so the other night I thought how I would want it to look and came up with this basket. Its very simple basket and though you could decorate it how ever you like by using dyed weaver, I decided to go with simple 2 racing stripes as a stake and keep it plain. I did add 4 ball feet to keep it more steady on the carpet.
Here are what I used:
No10 round reed for handle (cut 2 @ 17")
5/8" Flat natural and dyed for stakes (cut 5 Natural at 39" and 7 Natural at 35" and 2 Dyed at 35")
3/8" Flat for filler and weavers (cut 4 at 17")
1/2" Flat Oval for rim
3/16" Flat Oval for lashing
seagrass for rim filler
4 ball knob for feet (1-1/4")
First we make the handle: here is a link to my tutorial to make handles
mark at 4" on each end then mark again about 1/2 inch towards the center , wet well, shape and let dry. Cut at the mark less than half way !!! don't cut through anymore.. you only want to cut about the thickness of the rim you'll be placing in there!!! make sure the 1/2" Flat oval fits in the cut you made and make sure its deep enough that it catches if not adjust accordingly, set aside.
cut all pieces, mark all at center on the rough side and soak in water.
base:
Lay the 39" stakes horizontally, lay the fillers in between them lining them up at the center line.
take 1 of the 35" stake and weave in vertically on the center line making sure that the stake is placed over the filler and under the stakes. weave in 4 more stakes in one side and on the other side weave in 1 natural, 2 dyed and 1 natural.
measure the base to be 5"X 11"
cut the filler longways up to the the vertical and chicken scratch each filler.
twine once around with no2 or no3 round.
spray down with water and upstake
weaving:
29 rows of 3/8" flat flat with last row being rim row.
pack down and straighten the stakes. cut and tuck as you normally do
attach your handle to the short end 1st and the 5th stake
rim with 1/2" flat oval
add seagrass
lash with 3/16" flat oval
glue ball knob to the bottom
add grocery sack! enjoy!!
Here are what I used:
No10 round reed for handle (cut 2 @ 17")
5/8" Flat natural and dyed for stakes (cut 5 Natural at 39" and 7 Natural at 35" and 2 Dyed at 35")
3/8" Flat for filler and weavers (cut 4 at 17")
1/2" Flat Oval for rim
3/16" Flat Oval for lashing
seagrass for rim filler
4 ball knob for feet (1-1/4")
First we make the handle: here is a link to my tutorial to make handles
mark at 4" on each end then mark again about 1/2 inch towards the center , wet well, shape and let dry. Cut at the mark less than half way !!! don't cut through anymore.. you only want to cut about the thickness of the rim you'll be placing in there!!! make sure the 1/2" Flat oval fits in the cut you made and make sure its deep enough that it catches if not adjust accordingly, set aside.
cut all pieces, mark all at center on the rough side and soak in water.
base:
Lay the 39" stakes horizontally, lay the fillers in between them lining them up at the center line.
take 1 of the 35" stake and weave in vertically on the center line making sure that the stake is placed over the filler and under the stakes. weave in 4 more stakes in one side and on the other side weave in 1 natural, 2 dyed and 1 natural.
measure the base to be 5"X 11"
twine once around with no2 or no3 round.
spray down with water and upstake
weaving:
29 rows of 3/8" flat flat with last row being rim row.
pack down and straighten the stakes. cut and tuck as you normally do
attach your handle to the short end 1st and the 5th stake
rim with 1/2" flat oval
add seagrass
lash with 3/16" flat oval
glue ball knob to the bottom
add grocery sack! enjoy!!
Labels:
Basket Patterns,
basket weaving
Thursday, November 17, 2011
Catch all Basket
Today I want to share with you my newest basket I completed. Its by Suzanne Moore and you can find her free pattern here. I started using glue to attach the spoke/stake to the base because most of the reed I've been getting lately have been too loose on the base and it just don't want to stay put! If you notice that your reed are loose on the base I suggest you use glue such as insta glue or maxi glue and if you are going to buy the glue make sure you get the glue un-cure. You may make the same mistake I've made in the past, added on one too many spokes in the base and I could not get it off of it until I used un-cure.
Happy weaving!!
Happy weaving!!
Labels:
Basket Patterns,
basket weaving
Thursday, November 10, 2011
Totoro
Today, instead of sharing with you basket pattern, (sorry if you where looking for one) but I want to share with you something I've been working on. When it gets cold I like to work with yarn and while the outside temp started to drop, I started looking on line to see what I can work on. I found a site that a gal came up with pattern to make Totoro Amigurumi. What is Amigurumi? that's Japanese word for Crocheted stuffed toy. What is Totoro? I can't be too sure what he is but he is Anime character from my neighbor Totoro by Hayao Miyazaki. He also wrote and directed Anime like Ponyo and Kiki's delivery service.
anyway I found this free pattern site totoro and made one! so cute! It was very easy to make it!! now I'm making the little white one and I hope to find a pattern for the LARGE gray one and maybe even the catbus!!
Monday, November 7, 2011
Halloween party foods
Today I want share with you what I made for this year's Halloween party.
I try to find gross looking but tasty food to serve at our Halloween party.
Yummy Mummy from Rodes bread site but I used my own dough.
Here are some roasted hands.. actually its meatloaf. You can find instruction here at notmartha
better view of the hands
speaking of meatloaf... how about some meaty feet?
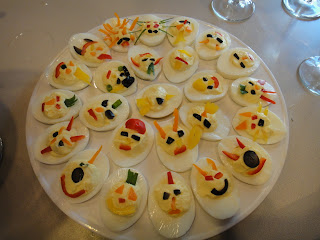
Deviled Eggs
I made this egg in likeness to my 22 year old son
Larva mini pig in a blanket
Pasta Salad
Halloween shaped Pasta from World Market
Eyes
Lychee stuffed with blueberries
cream cheese brain
(melt the cream cheese, color it, put it in a small brain mold chill until ready to use)
red stuff is triple berry and pepper jelly goes well with cream cheese and crackers
Labels:
Halloween
Monday, October 31, 2011
Carving pumpkin
I wanted to share with you how I carve a pumpkin. There are many different ways to carve and I don't think there is right or wrong way just like weaving basket and this is my way and I've been doing this way for a while. Each year I get pumpkin for each one of us, hoping for one day able to carve our own pumpkin and have a contest to see who carved the best pumpkin but somehow I always end up carving all the pumpkin each year. Each year my husband would ask me to carve his, and make a Red Wings logo, Each year I carve him one. Last year I went with Al the Octopus (Red Wings mascot) but all the other year it has been pretty much Red Wings. I think I may have carved him Luther's seal many many many years ago but for the last 5- 6 years it has been Red Wings. So this year when I saw this giant pumpkin that looked like it was taking a nap, I thought it would be perfect for Red Wings logo
If you already know what you want to carve, picking out the pumpkin is easy. If you are doing a traditional Jack-o-lantern then any pumpkin. After you pick out your pattern and pumpkin, match the pattern to fit the pumpkin by re-sizing the pattern.
Not sure which is the better option like the traditional cutting the top off and scraping out the guts.
Take the top off, trim it and then scoop out the guts!
its all clean!
Or my cutting out the bottom of the pumpkin or where it will be the bottom (I do it this way now)
start by cutting the bottom of the pumpkin or where it will be on the ground or a table in a angle and go around . Pull off the opening and cut off the stringy seedy mess, scoop out the guts and scrape a little to make your carving easier just like if you cut the top.
either way you cut the pumpkin you'll need a pattern, which you can find on the internet for free or make your own. tape it to your pumpkin. (you can also free hand by drawing on the pumpkin its up to you.
Some carving kits comes with a pattern poker to poke around the design to mark where you are supposed to cut but I get confused when doing intricate designs so I use a knife to cut out the paper and mark the pumpkin at the same time. This way you know you don't miss a thing.
Hard to see on the picture but you should see a cut out line. this is where you "saw it out" with what??
with these tools I use!
after sawing you'll get something like this. then I use this tool.. its wood carving tool but comes in handy for pumpkin skins. If I notice my saws going dull or to bendy, I buy one after Halloween on 75%off and save it for next year. Wood Carving tool will last a long long time. I've had these for about 4 years and still going strong!
After scrape off the orange skin then use something like this to smooth out the white flesh. Here on the right is a polymer clay tool
Happy Halloween!
my 5 year old carved this one using the little pumpkin he got on a field trip with his Kindergarten class
HAPPY HALLOWEEN!
Labels:
Halloween,
random things
Subscribe to:
Posts (Atom)