baskets

baskets

Friday, December 21, 2012

Japanese Style Cake

This is a typical "decoration cake" in Japan. 

I made 10" two layer cake so  I used

Eggs 9 Large (separated)
sugar 195gm
Cake flour 135gm

yes that's all you'll need  for this sponge! no butter, no baking powder, nothing you can't pronounce!

line 2- 10" round cake pan with parchment paper. (I'm assuming you know how to do this, if not please leave me a comment and I will take pictures next time I bake a cake and post pics)

whip the white using hand or stand mixer until stiff peak.  don't over do it but don't under do it either! , set aside, break the yolks and start whipping adding sugar in 3rds and whip until it looks like mayo.

sift the cake  flour 3 times, add flour to the yolk and beat on low until it is incorporated.

add white  to yolk mixture gently with rubber spatula or balloon whip.  make sure its incorporated but not over mix.

! I put a little of the white in first and mix it by hand real quick and well so the yolk mixture is not as stiff, then add the rest of the white and fold in gently until it is incorporated.  Don't over mix because you can deflate the whites and you won't get the beautiful fluffy soft sponge. 


Pour evenly into the 2 paper lined pan and  bake at 350F for 15-18min.  Make sure you check at 15mins. Most time it is ready, as long as its not wet or if you touch the middle of the cake and it springs back its ready.

take it out and drop it on the counter top to let the air out to stop the shrinking.
! important to do this or your cake may shrink and you'll be very sad.

while its warm, take it out of the pan and put it on the wire rack to cool.
! I always gently remove the paper from the side of the cake at this point but leave the bottom on until I'm ready to wrap it.

when its cool, I take the paper off the bottom and wrap it in plastic wrap until  ready to use. Make sure you wrap it completely not leaving any part exposed to keep it from drying out. 
!There is no reason for this other than the fact that I like to bake the cake at late at night and wrap it and then next morning put the cake together to serve.

 
Whip cream:
4 cups Heavy Whipping Cream
6-8Tbsp sugar
4packs Whip it

whip until soft/hard  peaks don't over do it! but  make sure it will hold shape.

Strawberries washed,hulled and some sliced, keep the small ones aside for topping.
blueberries washed and dried.

Decorating:

place 1 cake on plate, spread some whipped cream on top, place sliced strawberries on the cream, top cream on top of strawberries to cover them, top it with the  2nd cake.  cover the cake  with whipped cream, decorate it with extra whipped cream and top it with strawberries!

make sure you put it in the fridge!

Paper crafting

Today I want to show you things I've been making.


I've been crafting with paper lately and per my son's request I've made some of these little cube guys.   you print and cut it out with a craft knife and put it together to make these little cute Guys.  You don't even need a glue.  cubeecraft here is a link for you.


 Print out on card stock


Using your craft knife, cut out
 Like this


 Fold them


Like this


isn't it cute??


Monday, December 3, 2012

little drum basket


I ran across this free pattern several years ago and wanted to make it but never got around it until now! Now that I'm done with it, I just love it and its just sooooo cute! Perfect for Christmas! The pattern called for dark green, but I went with medium blue and wine just because I prefer the color.   LOVE it! Here is a link to the Christmas Drum Basket pattern.  I'm not sure how long the pattern will be up so if you want to weave it, print it out.

Happy Weaving!

Thursday, October 11, 2012

wall mail basket

Here is a basket I recently finished.  its called Americana Wall basket by NC Basketworks
there is the free link to the basket pattern.  I did not buy a ceramic buckle, but I found a thin wooden star shape in the right size at my local craft store so I drilled hole in it, then painted it.

 Tricky part was putting in the handle in the back without warping the basket or breaking the handle.
Ok it really wasn't that tricky but I had to be careful not to force it in too fast.
You could change the color of the basket and the decorative accent to fit what ever decor you like! you could do a red and green and attach a ornament to the basket and use it to hold Christmas cards!

Happy Weaving!!

Thursday, October 4, 2012

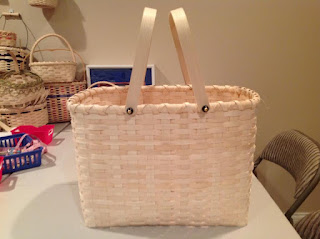
Stadium Basket

Hi everyone! I'm back and I'm going to try to keep up with my posting! I have lots to share but I will start with this one!

This basket is called Stadium basket and it has a handle you attach with a screw on the rim so I'm assuming its pretty sturdy, and also the bottom is reinforced with 1/2" flat oval pieces.  The basket pattern can be found at Suzanne Moore's NC Basket Works.

couple things I found when making my basket was the base ended up bigger than her's she said 13 1/2 X 6 1/2 but mine was more like 13 1/2 X 6 5/8 to almost 7" even if it was packed tight.  some reeds are thinner and my reed I used was true to its  size so I think that's why there was such a size different.  I asked Suzanne and she told me that the most important part was when the top of the basket since you'll need to attach the basket make sure the top is about 10 1/2" and when I finished it was at 10 1/2".

The other thing is the reinforcement.  She adds them at the end but I think adding them to the inside of the base before or after  twining the base twice would be better because it won't show as much and it easier to insert.

here is what my bottom looks like.


close up of the handle, the handle package comes with screw, bead and a nut.  Make  sure you wet the rims well, drill and then attach the handle! 


all supplies needed can be found at  NC Basket works  or get  the full kit from them.  They don't do internet order yet but you can call them or send them a e mail and they will help you!  their turn around time is really quick and the  handles and supplies are one of the best I've found so far!!

Happy Weaving!!


Monday, August 27, 2012

Aloha

 Hi Everyone! We went on vacation and now finally I'm going to share some of the things we did.

I did make a basket recently that I do want to share with you all but I don't have picture of it yet so I will share that later and for now I'm going to share some of the picture I took while my family and I had our Hawaiian Vacation.
 We where driving the Island just remembering things we saw and did when we lived here 10 years ago.  I can't believe its been that long but its has been 10 years!
 Per our youngest request we went on a Atlantis Submarine, first they take you out to sea on a boat, then into their submarine.
 Down down down we go, taking a good picture deep under the sea is little hard but did the best I can
 Here is my youngest looking out the window


they tat you up with the tribal stamps
t
Dinner
 I know this is horrible picture of  the guy but do any of you remember Glenn Medeiros? He was actually the host of our Luau!! (click the link to see his Wikipedia info)  He looked and sounded so familiar, for a second I thought I went to school with the guy.
Lots of dancing
On our departure day, they held a Parade in my honor, actually it was a King Kamehameha Day Parade, which I got to see in front of the Hotel we where staying at.  Next time I would like to stay for two weeks instead of one. 

Sunday, May 27, 2012

Missing My Hammy

Its been a week since my cat Hammy passed away.  each day it gets better  and better, I know its part of  life that we lose people and pets we love but its so hard to come to term with.  It has been a good experience for my youngest son who is 6 years old to process death.  He has lost grandparents in the past but he was too young to understand what death really is.  We had Hammy for almost 13 years, in August he would have been 13, he leaves behind his step brother cat Tora who is still a little lost without him but I'm sure he too will survive.  Maybe one day I will be able to get a kitten for Tora to nurture so he can be happy again. I will miss Hammy forever and he will never be replaced by any other kitty no matter how cute they are.

Thursday, May 10, 2012

Shelf Storage Basket


Just finished this today! its Shelf Storage Basket by Suzanne Moore She has a free pattern on her site.  You can also get all the supply you need from her.  Good prices and very friendly service.  Here is a link to the free pattern by Suzanne click here


 these has leather handles
 and a hard wood strip  for inner rim which you can also get it from her and you also add some flat oval to give it more support

 The pattern called for 7MM flat to lash but it seemed too large to fit, I used 3/16 instead.

Here is a shot with clothes pin in front to give you a idea how large it is.


what should I store in here??

Thursday, April 26, 2012

Northwood Berry Basket

Hello friends!

sorry I haven't posted in a while, as always I have lots of excuses but the biggest one this week is that I'm under the weather and feeling rather ick! anyway I wanted to quickly post my  basket I just made on Tuesday and point you in the direction to where you may be able to purchase the pattern.  Joanna's collections 
you can get a free pattern monthly but you need to print it right away because it changes monthly and you don't want to miss out on cool basket patterns.  If you miss the free one but you want to purchase it, you can through her web site and she will PDF it so there is no waiting for the mail man. I think I got this pattern long ago before she switched to the new website so its not listed in the archive but if you request the pattern. I'm sure she'll sell it to you.  I check her site often to see if she has new patterns up and print it even if I don't plan on making them at that time because I know later I'm going to want to make it.

enjoy your weekend! 


Sunday, April 8, 2012

double Curled Easter Basket

I am sooooo sorry for not posting the curls portion of the Easter basket.  My son who I was making the basket for didn't want any curls in them...  sooo I had nothing! I will post a instruction of curls and show you where you need to put them (sorry its after Easter) later this week.

Thursday, March 29, 2012

Double Curled Easter Basket Part 4

Some people wrap the handle after the rim but I was thought to do the rim before the rim so that's what I do.  You can do it how ever you like but this tutorial is for novice weaver.

so you should have a basket like this, handle ready to be wrapped.  You'll need 1/4" flat flat color and long 1/4" flat flat natural.

the colored 1/4" flat flat will be the accent piece and rather than just putting it from the rim I decided to put it all the way down to the base of the basket.


now take a long long piece of 1/4" flat flat soaked well rough side down and insert it behind the handle.


 turn the basket so the outside of the basket is facing you and simply wrap around the handle.
 continue 3 times.  Why 3? I don't know why, that's what I was taught years ago, so that's what I do.  It is important to wrap the handles tightly and not over lap but at the same time do not leave a gap between each round.
 then you take the reed under the accent piece, then over, under, over, under, over, under and so on.  You can make a pattern if you like by going over twice, under once, what ever you like.


 after you reach near the end of the handle you can eye and see where about 3more rounds to end the handle, pull through the accent piece all the way down to the base, just like the other side.
pull and cut the accent piece


now wrap the handle 3 more times and pull the end through the back of the handles like you did in the start.


 underside of the handle should be smooth and gap free like this.
 and not to worry about the gap there because that's where the rim will go!

pretty right?


Rim time!

 measure around the rim row this one was 29" so I cut 1 piece of 1/2" flat oval and add 2 inch and cut 1 more at 31"
 soak well and take the long piece and place it around the  rim row and use clothes pin to hold  it in place.
take a pencil and mark where it overlaps. 

Outside of the overlapping


 and same for the  inside of the over lapping

do the same thing for the inside of the basket  using the shorter piece.  Make sure you leave the rounded side out.
 You should have 2 pieces with pencil mark.  Each piece should have a mark on the rounded side and on the other end should be on the flat side.
 When I started weaving we didn't have cool tools like these so I used little paring knife.  Now I use  these super cool.. the yellow one, you can get it at any hardware store, the other one is woodworking tool, you can get it at widgetsupply.com its called a square carving router. 
 scarf off the rounded part
 then scarf some of the flat side on the other end.
I also  like to round off the end a bit to give it a more smooth look.


 put it back on the rim row on both inside and outside. make sure you start on opposite side.  Hold it in place with clothes pin.
 it should look like this.
I used 2 colors of no3 round reed in complimenting color, I started and stopped at the base of the handle on each side.  and used ziptie to hold it in place so you can remove the clothes pins.


 you can start lashing anywhere  but avoid the overlapped part.  Some people lash differently then I do but this is the way I was taught so this is the way I've  done it and the way I teach people how to do it.

insert the lasher in space between the spokes.
under the rim, under the rim filler.
down the other side inside of the rim.
 slide it from inside out on each space between the spokes. and pull it though and make sure you keep it tight


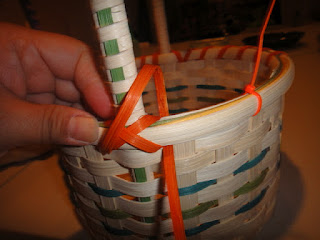
 so here we are at the handle.  We want to X the handle
 slide the lasher here.
 pull it through, making sure its tight.
 You want  to go back here and pull through
you made a X and now


Now you want to go back here to finish the X


pull through then continue until you reach the start


 here we are at the start
 to finish you do the same thing you started.
under the rim
 pull it through
 under the rim filler over the basket wall but under the  inside rim. pull it through and cut the ends at the rim.


All you now need is a curls!  I will post my final part 5 later this weekend just in time for Easter!