Some people wrap the handle after the rim but I was thought to do the rim before the rim so that's what I do. You can do it how ever you like but this tutorial is for novice weaver.
so you should have a basket like this, handle ready to be wrapped. You'll need 1/4" flat flat color and long 1/4" flat flat natural.
the colored 1/4" flat flat will be the accent piece and rather than just putting it from the rim I decided to put it all the way down to the base of the basket.

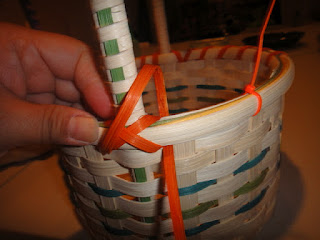
now take a long long piece of 1/4" flat flat soaked well rough side down and insert it behind the handle.
turn the basket so the outside of the basket is facing you and simply wrap around the handle.
continue 3 times. Why 3? I don't know why, that's what I was taught years ago, so that's what I do. It is important to wrap the handles tightly and not over lap but at the same time do not leave a gap between each round.
then you take the reed under the accent piece, then over, under, over, under, over, under and so on. You can make a pattern if you like by going over twice, under once, what ever you like.
after you reach near the end of the handle you can eye and see where about 3more rounds to end the handle, pull through the accent piece all the way down to the base, just like the other side.
pull and cut the accent piece
now wrap the handle 3 more times and pull the end through the back of the handles like you did in the start.
underside of the handle should be smooth and gap free like this.
and not to worry about the gap there because that's where the rim will go!
pretty right?
Rim time!
measure around the rim row this one was 29" so I cut 1 piece of 1/2" flat oval and add 2 inch and cut 1 more at 31"
soak well and take the long piece and place it around the rim row and use clothes pin to hold it in place.
take a pencil and mark where it overlaps.
Outside of the overlapping
and same for the inside of the over lapping
do the same thing for the inside of the basket using the shorter piece. Make sure you leave the rounded side out.
You should have 2 pieces with pencil mark. Each piece should have a mark on the rounded side and on the other end should be on the flat side.
When I started weaving we didn't have cool tools like these so I used little paring knife. Now I use these super cool.. the yellow one, you can get it at any hardware store, the other one is woodworking tool, you can get it at widgetsupply.com its called a square carving router.
scarf off the rounded part
then scarf some of the flat side on the other end.
I also like to round off the end a bit to give it a more smooth look.
put it back on the rim row on both inside and outside. make sure you start on opposite side. Hold it in place with clothes pin.
it should look like this.
I used 2 colors of no3 round reed in complimenting color, I started and stopped at the base of the handle on each side. and used ziptie to hold it in place so you can remove the clothes pins.
you can start lashing anywhere but avoid the overlapped part. Some people lash differently then I do but this is the way I was taught so this is the way I've done it and the way I teach people how to do it.
insert the lasher in space between the spokes.
under the rim, under the rim filler.
down the other side inside of the rim.
slide it from inside out on each space between the spokes. and pull it though and make sure you keep it tight
so here we are at the handle. We want to X the handle
slide the lasher here.
pull it through, making sure its tight.
You want to go back here and pull through
you made a X and now
Now you want to go back here to finish the X
pull through then continue until you reach the start
here we are at the start
to finish you do the same thing you started.
under the rim
pull it through
under the rim filler over the basket wall but under the inside rim. pull it through and cut the ends at the rim.
All you now need is a curls! I will post my final part 5 later this weekend just in time for Easter!


 Now you want to go back here to finish the X


No comments:
Post a Comment