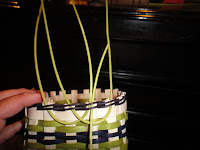
wet the base, upset stakes.
4 rows of 1/4inch flat reed (start and stop)
using 2 long strands of no2 round continuously twine 4rounds
4 rows of 1/4inch flat reed (start and stop)
using 2 strands of no2 round, continuously twine 2 rows
DO NOT CUT STAKES!! wet and tuck in ALL stakes.
time to braid the top! cut no2 dyed reed for the braid. Sml: 24 Piece at 22", Med: 32 pieces at 22", Lg: 40 pieces at 22" long. cut and wet briefly, then let it soak in to make sure they are not brittle. Keep spraying them to keep them from drying out and breaking while working with them. I used the simple basic braid because its easy and its very cute. if you prefer different braid feel free to do that but make sure you cut the reed to the the length you need for that braid.
Placement of the colored no 2 reed.
I know this is not a heart shaped but its same no matter what shape the basket is.. I call this basket "Frank" because it looks like Frankenstein colors.

Make room using your tool, and put one side of the reed in the space like the picture.
Skip one stake and put the other end of the no 2 round reed in the next space.
(hey, my shirt matches the basket color!)
Pull both ends evenly and leave a loop and also make sure both ends are even at the top.

Take another no2 and put it in the space you skipped.
Skip one and put it in the next space.
Take the 3rd piece and put it in the same space as the end of the 1st piece. like the picture.
again skip one and put the end in the next space.
4th piece goes to the next space with the single round.
Skip a space and the end of the piece goes in the next space. I'm hoping you are getting the pattern here.
 Put the last piece in
 When its done It'll look like this crazy hot mess
Part 1 of the braid.
from here on you will treat the 2 round piece in each space as one stake and make sure you don't twist them. so take 2 stakes. left and right.
Take the left stake and put it behind the right stake.
Like this
Continue doing this
Until last stake
Take the left stake and push it through the space you made with the very first stake you tucked behind the right stake
pull it through
and first part of the braid is done!
put the left stake in the hole you made when you pulled the right stake and pull it through. Continue to do this until the lasts stake.
take the last stake and put it though the space you made when you put the first left stake into the right hole. where the weaving tool is..
then you pull it through
You'll end up with a birds nest.
Part 3 repeat part 1 of the braid but you'll be working more inside of the basket. left stake, right stake
just like the first step.
Whens you are done you should have something like this.

Part 4 repeat part 2 but inside the basket. Pull right stake, put left stake in hole
Pull through and repeat until all stakes are pulled through like part 2
then you are done! wait until its completely dried before cutting!
 |
| Frank |


I love the color combo, great photos of the braid rim.
ReplyDeleteThis is very clear and easy to follow.
ReplyDeleteThanks
This is very clear and easy to follow.
ReplyDeleteThanks
Love the look of this rim. Better than the
ReplyDeletewretched gretchen